Advanced Usage
This section explores some advanced features of Postman and Newman, including data-driven testing and environment variable data-driven testing.
Data-Driven Testing
In the process of API automation testing, data-driven testing is a common approach where the input and expected output data of test cases are stored in data files. The testing framework executes multiple tests based on these data files to validate various aspects of the API.
Data-driven testing allows for easy modification of test data without altering the test case code, providing flexibility in testing scenarios and ensuring the API functions correctly under various input data.
Refer to the demo: Postman-Newman-demo
For data-driven testing in Postman, especially using JSON data as test data, it can be achieved by combining environment variables and data files with the testing scripts provided by Postman. The usage of environment variables and data files is illustrated with simple examples.
Using Environment Variables
The general steps are to store test data in environment variables and then read the data from these variables in the testing scripts.
1. Create Environment Variables
In Postman, you can create environment variables in the “Manage Environments” window. Each environment can have a set of variables. For example, in the DemoEnv environment, variables such as baseURL, getAPI, getAPIResponseStatus, and others can be added to store various test data.
2. Use Environment Variables
In the “Pre-request Script” or “Tests” sections, you can use environment variables to store and retrieve data. In the request body, you can use pm.environment.get to fetch the value of an environment variable.
Edit the get-demo API:
- Modify the URL to
{{baseURL}}/{{getAPI}}. - Edit the Tests script to validate the response data.
// Fetch data from environment variables
const getAPIResponseStatus = parseInt(pm.environment.get("getAPIResponseStatus"));
const getAPIResponseData = JSON.parse(pm.environment.get('getAPIResponseData'));

pm.test("res.status should be 200", function () {
    pm.response.to.have.status(getAPIResponseStatus);
});

pm.test("res.body should be correct", function() {
  var data = pm.response.json();
  pm.expect(data.id).to.equal(getAPIResponseData.id);
  pm.expect(data.userId).to.equal(getAPIResponseData.userId);
  pm.expect(data.title).to.equal(getAPIResponseData.title);
  pm.expect(data.body).to.equal(getAPIResponseData.body);
});
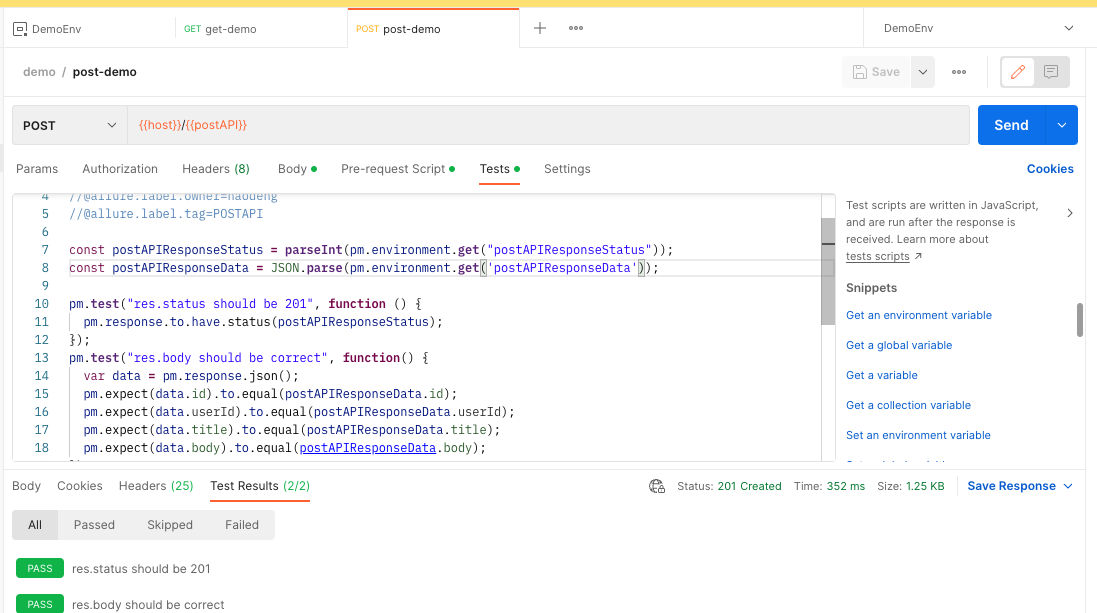
Edit the post-demo API:
- Modify the URL to
{{baseURL}}/{{postAPI}}. - Edit the Tests script to validate the response data.
// Fetch data from environment variables
const postAPIResponseStatus = parseInt(pm.environment.get("postAPIResponseStatus"));
const postAPIResponseData = JSON.parse(pm.environment.get('postAPIResponseData'));

pm.test("res.status should be 201", function () {
  pm.response.to.have.status(postAPIResponseStatus);
});
pm.test("res.body should be correct", function() {
  var data = pm.response.json();
  pm.expect(data.id).to.equal(postAPIResponseData.id);
  pm.expect(data.userId).to.equal(postAPIResponseData.userId);
  pm.expect(data.title).to.equal(postAPIResponseData.title);
  pm.expect(data.body).to.equal(postAPIResponseData.body);
});
- Click Save and then click Send to be shown that the test passes.
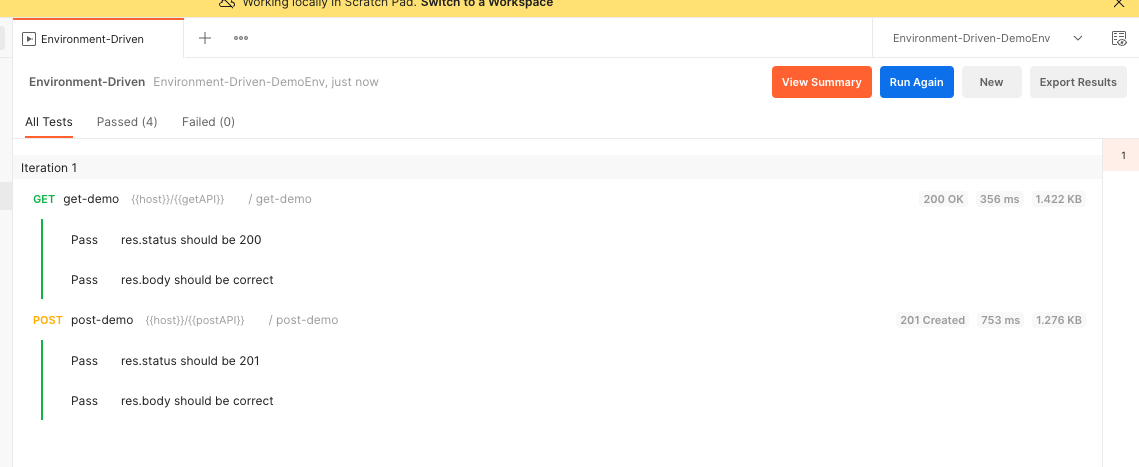
3. Debugging Environment Variable Data-Driven Scripts
Select the corresponding environment variable and the updated test case, run the entire demo collection, and confirm that the tests pass.
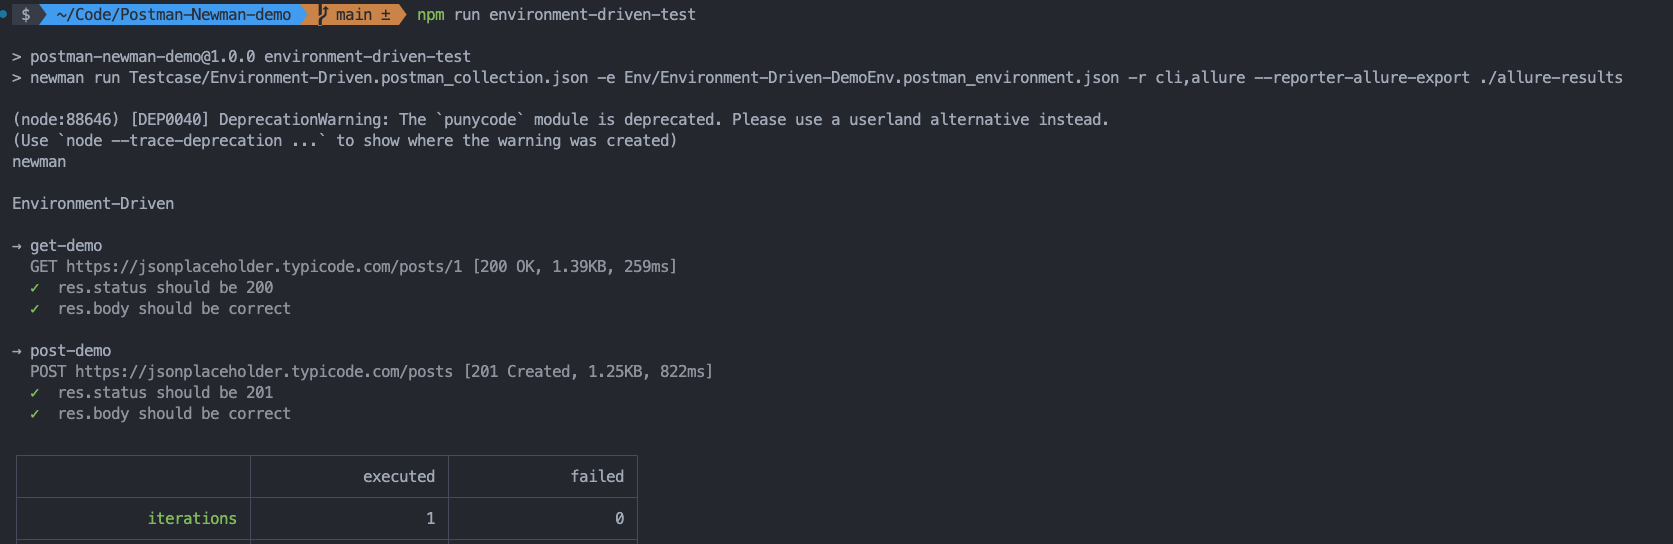
4.Automated Execution of Environment Variable Data-Driven Scripts
- Export the updated test cases to the test case folder of the automation test project.
- Adjust the
package.jsonfile:
In the package.json file, update the test script to run the environment variable data-driven test cases:
"environment-driven-test": "newman run Testcase/Environment-Driven.postman_collection.json -e Env/Environment-Driven-DemoEnv.postman_environment.json -r cli,allure --reporter-allure-export ./allure-results",
- Run the test:
npm run environment-driven-test
Using Data Files
The general steps are to store test data in data files and then read the data from these files in the testing scripts. Postman supports various data file formats such as JSON, CSV, and TXT. The following example uses JSON format.
1. Create Data Files
- Create a
Datafolder under the Postman API automation testing project.
mkdir Data
- Create a JSON format data file named
testdata.jsonunder theDatafolder.
cd Data
touch testdata.json
- Update the test data file
testdata.json.
[
  {
    "getAPI": "posts/1",
    "postAPI": "posts",
    "getAPIResponseStatus": 200,
    "getAPIResponseData": {
      "userId": 1,
      "id": 1,
      "title": "sunt aut facere repellat provident occaecati excepturi optio reprehenderit",
      "body": "quia et suscipit\nsuscipit recusandae consequuntur expedita et cum\nreprehenderit molestiae ut ut quas totam\nnostrum rerum est autem sunt rem eveniet architecto"
    },
    "postAPIResponseStatus": 201,
    "postAPIResponseData": {
      "title": "foo",
      "body": "bar",
      "userId": 1,
      "id": 101
    }
  }
]
2. Update Test Cases
Update the get-demo API:
- Edit the Pre-request Script to fetch the request URL from the test data file.
const getAPI = pm.iterationData.get('getAPI');
Modify the URL to
{{baseURL}}/{{getAPI}}.Edit the Tests script to fetch test data from the test data file.
const getAPIResponseStatus = pm.iterationData.get('getAPIResponseStatus');
const getAPIResponseData = pm.iterationData.get('getAPIResponseData');

pm.test("res.status should be 200", function () {
  pm.response.to.have.status(getAPIResponseStatus);
});
pm.test("res.body should be correct", function() {
  var data = pm.response.json();
  pm.expect(data.id).to.equal(getAPIResponseData.id);
  pm.expect(data.userId).to.equal(getAPIResponseData.userId);
  pm.expect(data.title).to.equal(getAPIResponseData.title);
  pm.expect(data.body).to.equal(getAPIResponseData.body);
});
Update the post-demo API:
- Edit the Pre-request Script to fetch the request URL from the test data file.
const postAPI = pm.iterationData.get('postAPI');
Modify the URL to
{{baseURL}}/{{postAPI}}.Edit the Tests script to fetch test data from the test data file.
const postAPIResponseStatus = pm.iterationData.get('postAPIResponseStatus');
const postAPIResponseData = pm.iterationData.get('postAPIResponseData');

pm.test("res.status should be 201",

 function () {
  pm.response.to.have.status(postAPIResponseStatus);
});
pm.test("res.body should be correct", function() {
  var data = pm.response.json();
  pm.expect(data.id).to.equal(postAPIResponseData.id);
  pm.expect(data.userId).to.equal(postAPIResponseData.userId);
  pm.expect(data.title).to.equal(postAPIResponseData.title);
  pm.expect(data.body).to.equal(postAPIResponseData.body);
});
3. Debugging
- In the Postman application, select the
get-demoandpost-demorequests in the demo collection, click the three dots in the upper right corner, choose “Run Collection.” - In the runner preparation page, click the “Select File” button on the right side of Data, choose the previous test data file
testdata.json.
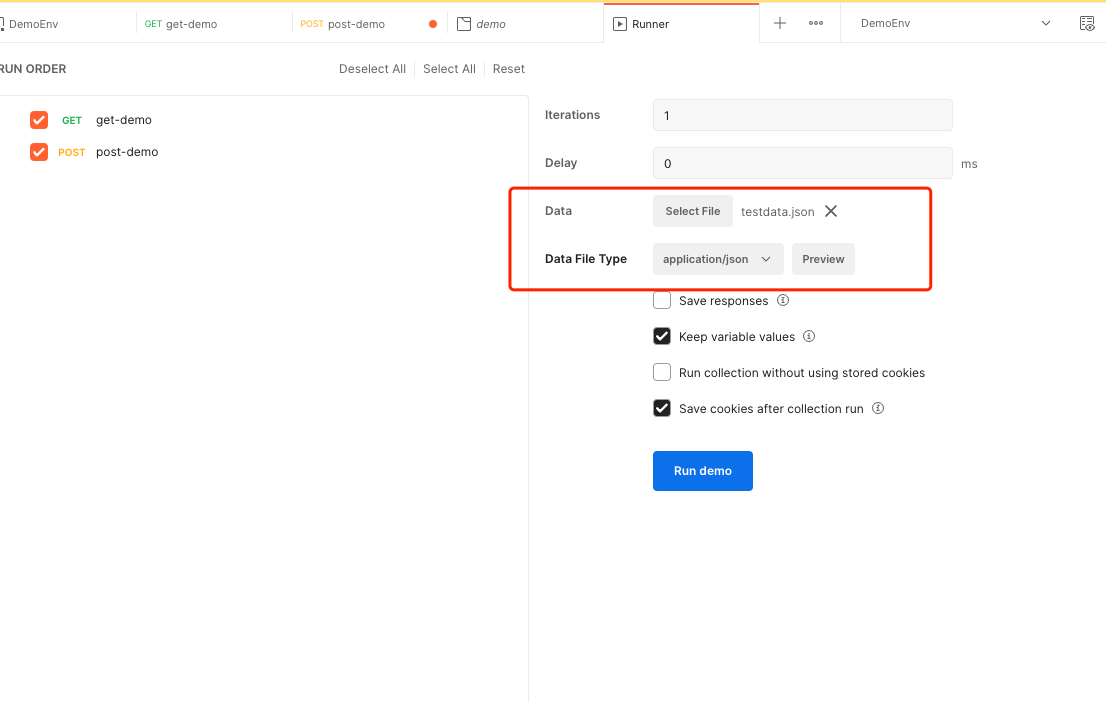
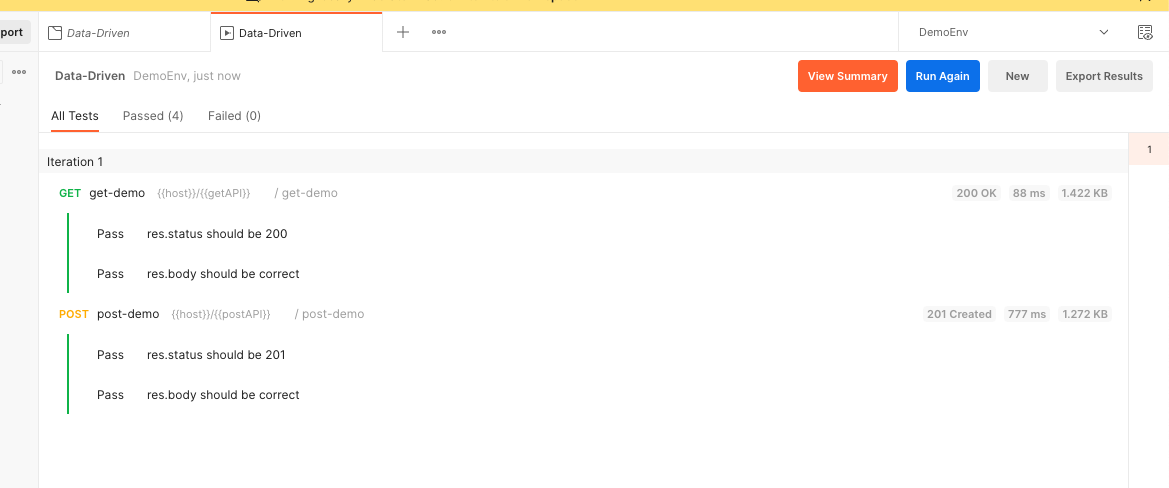
- Click “Run demo,” confirm a successful run, and then export the test case file.
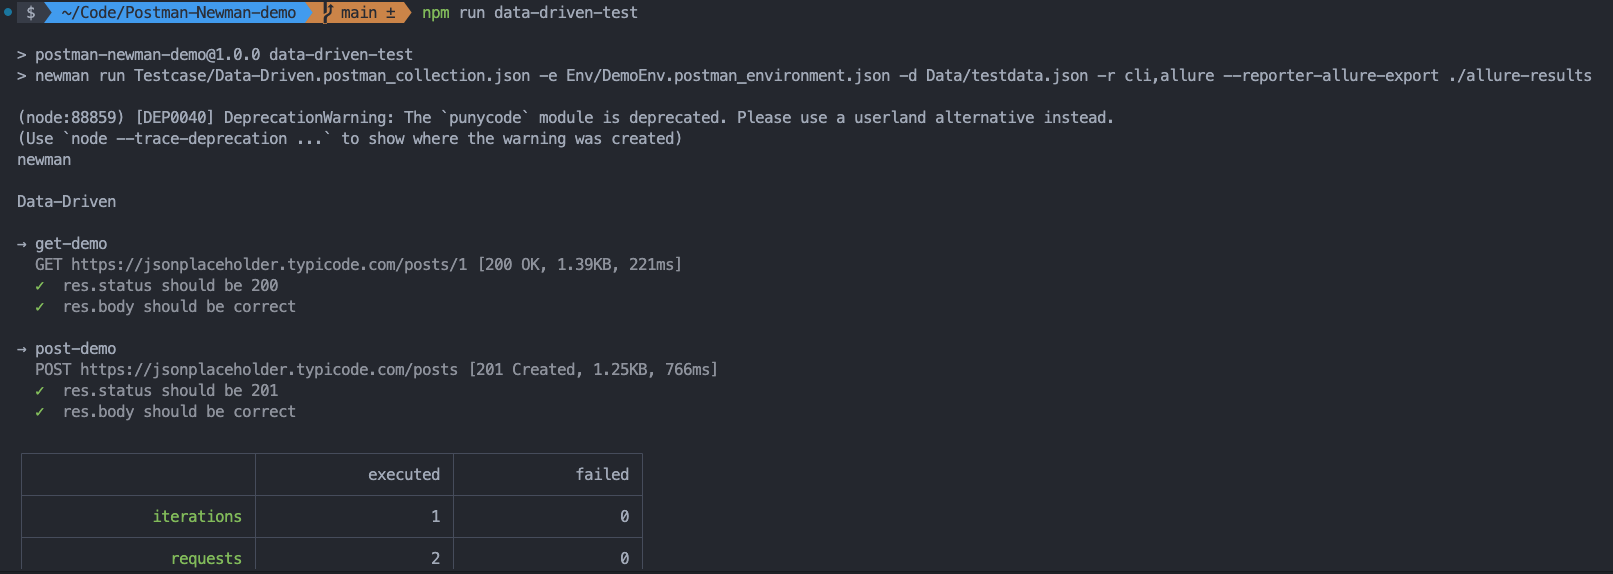
4. Automated Execution of Data-Driven Scripts
- Export the updated test cases to the test case folder of the automation test project.
- Adjust the
package.jsonfile:
In the package.json file, update the test script to run the data-driven test cases:
"data-driven-test": "newman run Testcase/Data-Driven.postman_collection.json -e Env/DemoEnv.postman_environment.json -d Data/testdata.json -r cli,allure --reporter-allure-export ./allure-results"
- Run the test:
npm run data-driven-test