Introduction of K6
k6 is an open source tool for performance testing and load testing, primarily used to evaluate and validate the performance and stability of applications. Here are some key features and information about k6:
Open Source: k6 is a completely open source performance testing tool with code stored on GitHub. This means that users are free to access, use and modify the tool’s source code.
JavaScript scripting: k6 uses the JavaScript language to write test scripts, which makes writing test cases relatively easy and more developer-friendly. Scripts can contain HTTP requests, WebSocket connections, script execution logic, and more.
Support for multiple protocols: k6 supports a variety of common protocols, including HTTP, WebSocket, Socket.IO, gRPC and so on, so it can be widely used in various types of applications. 4.
Distributed Testing: k6 has distributed testing capabilities, allowing tests to be run on multiple nodes to simulate a more realistic production environment load.
Real-time results and reports: k6 provides real-time results, including request response time, throughput, etc., and is able to generate detailed HTML reports to help users better understand the performance status of their applications.
Containerization Support: k6 adapts to containerized environments, can be easily integrated into CI/CD pipelines, and works with common container orchestration tools such as Kubernetes.
Plugin ecosystem: k6 supports plugins that allow users to extend its functionality to meet specific needs.
Active Community: Since k6 is an open source project, there is an active community that provides support, documentation, and examples to make it easier for users to get started and solve problems.
Overall, k6 is a flexible, powerful and easy-to-use performance testing tool for applications and systems of all sizes.
Official website and documentation
Installation
Installation on Mac systems
Mac systems can install k6 via Homebrew:
brew install k6
Windows installation
Windows systems can install k6 via Chocolatey:
choco install k6
Or you can install k6 via winget:
winget install k6
Docker installation
k6 can also be installed via Docker:
docker pull grafana/k6
Installation on other systems
In addition to the above systems, K6 also supports Linux (Debian/Ubuntu/Fedora/CentOS), and can be installed by downloading the K6 binaries and K6 extensions, please refer to the [official documentation](https://k6.io/docs/get-started/ For details on how to install K6, please refer to the official documentation ().
Confirming a successful K6 installation
After the installation is complete, you can confirm that K6 has been installed successfully by using the following command:
k6 version
If the installation was successful, the k6 version information will be displayed:

First k6 test script
Write the first test script
Create a new K6 performance testing project directory and go to
mkdir k6-demo
cd k6-demo
Create a file named demo.js for writing test scripts
- A test script file can be created with the
k6 newcommand:
k6 new demo.js
- You can also create a test script file called demo.js directly
touch demo.js
Editing Test Scripts
If the test script file is created with the k6 new command, a simple test script is automatically generated as shown below:
import http from 'k6/http';
import { sleep } from 'k6';

export const options = {
  // A number specifying the number of VUs to run concurrently.
  vus: 10,
  // A string specifying the total duration of the test run.
  duration: '30s',

  // The following section contains configuration options for execution of this
  // test script in Grafana Cloud.
  //
  // See https://grafana.com/docs/grafana-cloud/k6/get-started/run-cloud-tests-from-the-cli/
  // to learn about authoring and running k6 test scripts in Grafana k6 Cloud.
  //
  // ext: {
  //   loadimpact: {
  //     // The ID of the project to which the test is assigned in the k6 Cloud UI.
  //     // By default tests are executed in default project.
  //     projectID: "",
  //     // The name of the test in the k6 Cloud UI.
  //     // Test runs with the same name will be grouped.
  //     name: "demo.js"
  //   }
  // },

  // Uncomment this section to enable the use of Browser API in your tests.
  //
  // See https://grafana.com/docs/k6/latest/using-k6-browser/running-browser-tests/ to learn more
  // about using Browser API in your test scripts.
  //
  // scenarios: {
  //   // The scenario name appears in the result summary, tags, and so on.
  //   // You can give the scenario any name, as long as each name in the script is unique.
  //   ui: {
  //     // Executor is a mandatory parameter for browser-based tests.
  //     // Shared iterations in this case tells k6 to reuse VUs to execute iterations.
  //     //
  //     // See https://grafana.com/docs/k6/latest/using-k6/scenarios/executors/ for other executor types.
  //     executor: 'shared-iterations',
  //     options: {
  //       browser: {
  //         // This is a mandatory parameter that instructs k6 to launch and
  //         // connect to a chromium-based browser, and use it to run UI-based
  //         // tests.
  //         type: 'chromium',
  //       },
  //     },
  //   },
  // }
};

// The function that defines VU logic.
//
// See https://grafana.com/docs/k6/latest/examples/get-started-with-k6/ to learn more
// about authoring k6 scripts.
//
export default function() {
  http.get('https://test.k6.io');
  sleep(1);
}
If the test script file was created directly, you can copy the above into the demo.js file.
Running the Test Script
In the directory where the demo.js file is located, run the following command:
k6 run demo.js
Check the test results
If all is well, you will see output similar to the following:
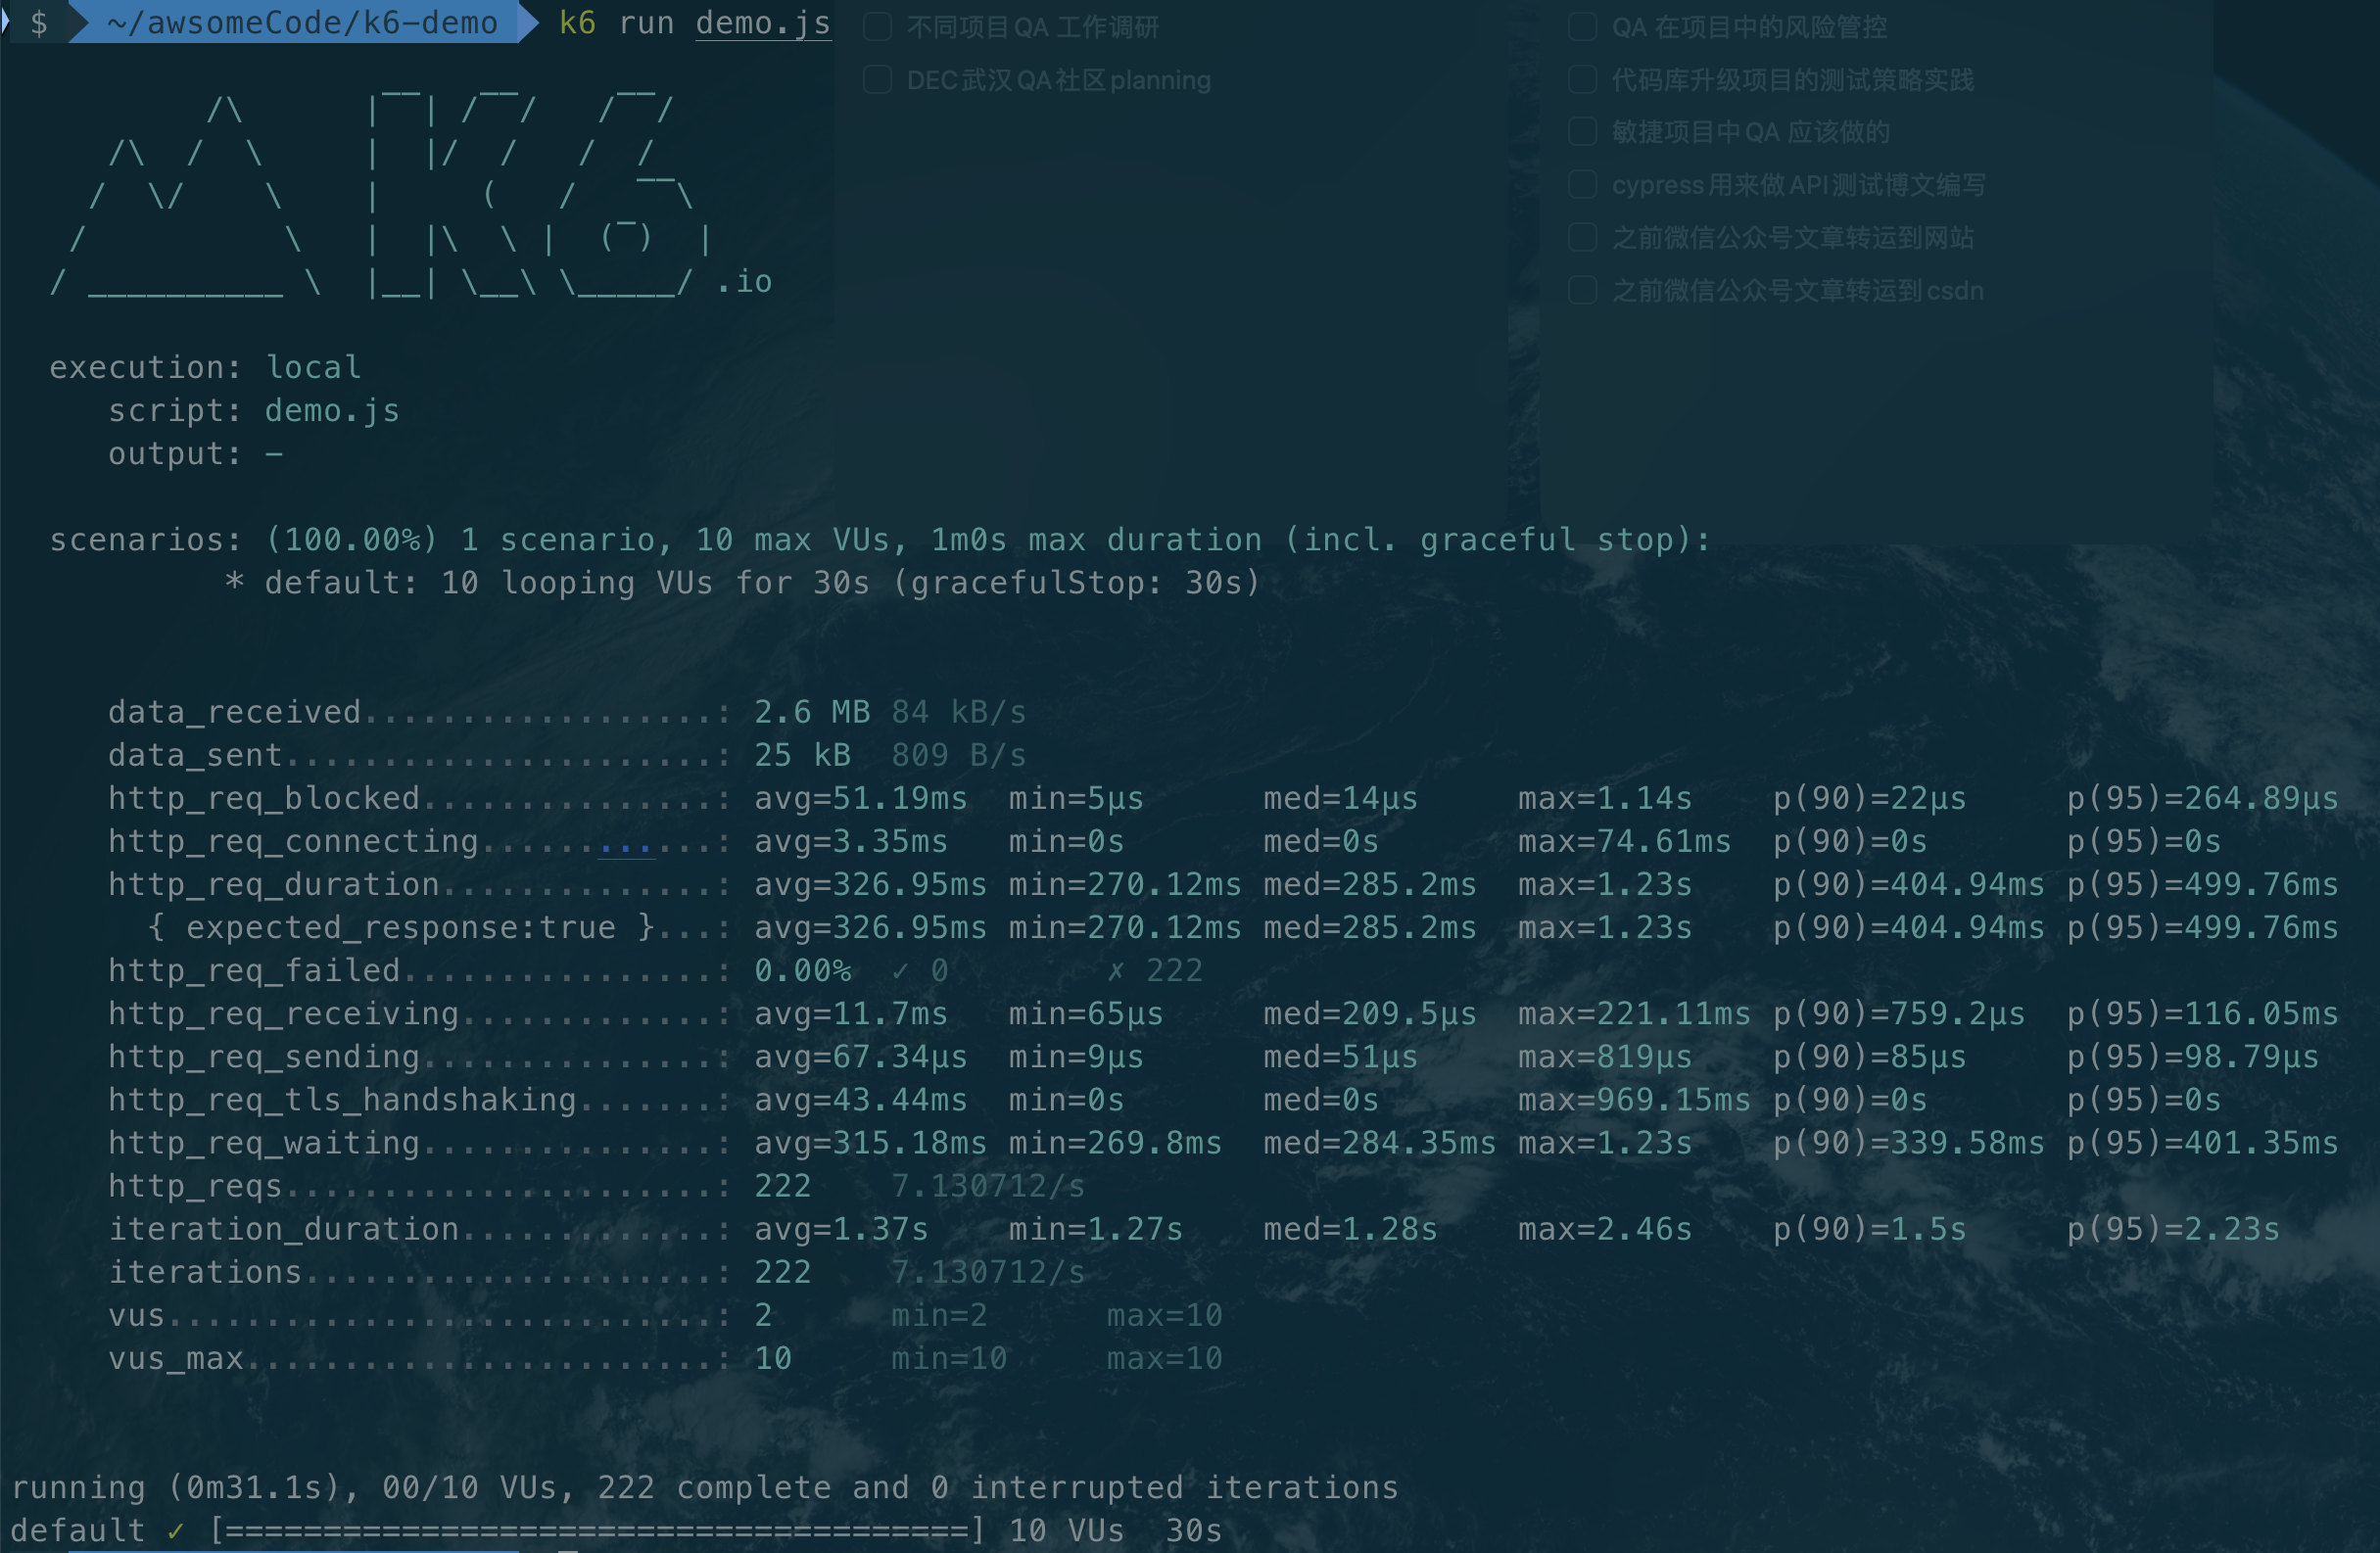
Contains the following information:
- execution: execution information, including start time, end time, duration, number of VUs, number of iterations, etc.
- scenarios: Scenario information, including scenario name, number of VUs, number of iterations, duration, average response time, throughput, and so on.
- http_reqs: HTTP request information, including request name, number of requests, number of failures, average response time, throughput, and so on.
Parsing demo test script
import http from 'k6/http';: import k6’s HTTP module, used to send HTTP request.import { sleep } from 'k6';: Import k6’s sleep method to wait for script execution.export const options = { ... }: Define the configuration items of the test script, including the number of VUs, duration, etc.vus: 10,: define the number of VUs to be 10 (specify the number of VUs running concurrently).duration: '30s',: define the duration as 30 seconds (specify the total duration of the test run).export default function() { ... }: defines the logic of the test script, including sending HTTP requests, executing waits, and so on.http.get('https://test.k6.io');: send a GET request tohttps://test.k6.io.sleep(1);: wait 1 second for execution.
The other comments can be ignored, they are about some advanced features of k6, which will be introduced later.