文章由 UI 测试最佳实践项目 内容翻译而来,大家有条件的话可以去 UI 测试最佳实践项目阅读原文。
组合测试
组合测试一段简要说明
- 组合测试 是一种经过验证的、成本较低的、更为有效的软件测试方法。
- 这种测试的关键思想是,并非每个参数都对每次故障都有影响,而是大多数故障是由相对较少的参数之间的相互作用引起的。
- 与传统方法相比,测试参数组合可以更有效地检测故障。
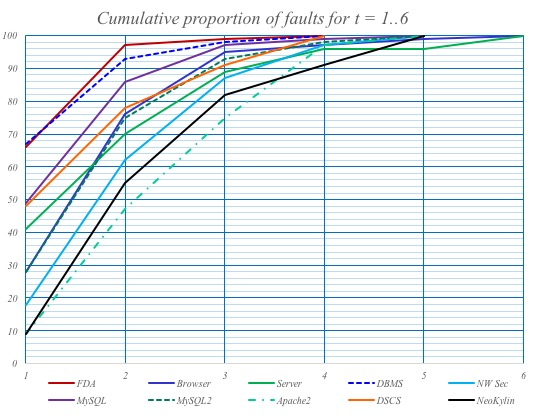
美国国家标准与技术研究院NIST 在 1999 年到 2004 年进行的一系列研究表明,大多数软件缺陷和故障是由一个或两个参数引起的,逐渐减少到由三个或更多参数引起的。这一发现被称为“交互规则”,对软件测试具有重要意义,因为这意味着测试参数组合可以比传统方法更有效地检测故障。NIST 和其他机构收集的数据表明,软件故障仅由少数几个变量的相互作用引发(不超过六个)。有时使用成对(2 路组合)测试可以以较低的成本获得相当不错的结果,通常不低于 60% 的故障覆盖率,但这可能对于关键任务的软件来说可能不足够。
(1) 代码示例 – 产品负责人问题
一位产品负责人曾提出一个问题:
“从最佳实践或实际角度来看,你是否应该在每种可能的配置下测试系统? 例如,假设你有 A、B、C、D、E 五个功能,客户 1 拥有 A/B,客户 2 拥有 A/B/C,客户 3 拥有 A/D,客户 4 拥有 B/D,客户 5 拥有 A/B/C/D/E…. 你是否应该测试每种可能的功能组合,还是测试每个功能单独,如果它们在独立测试中能够正常工作,就相信它们整体上也能正常工作?”
5 个客户和 5 个功能,详尽无遗将需要 25 个测试。 在描述的约束条件下,只需要 14 个测试。 为了提供一个代码示例,我们将使用描述规格的CTWedge脚本化组合模型。还有许多其他列在pairwise.org上的 CT 工具。我们(在西门子)使用过的其他一些工具包括ACTs和CAgen。
Model POquestion
 Parameters:
   features : {A, B, C, D, E}
   customer:  {1, 2, 3, 4, 5}

 Constraints:
   # customer = 1 => features = A || features = B #
   # customer = 2 => features = A || features = B || features = C #
   # customer = 3 => features = A || features = D #
   # customer = 4 => features = B || features = D #
   # customer = 5 => features = A || features = B || features = C || features = D || features = E #
在这里粘贴脚本以生成结果 这里。
测试的目标是检验参数之间的双向(或更多)相互作用。当只有两个参数时,收益并不太明显,因为这是一种穷举的方法。
如果参数数量超过两个,对它们之间的双向交互进行覆盖将确保找到该领域可能存在的 60-99% 的所有潜在缺陷。三向交互为 90%,四向为 95%,五向为 97%,六向为 100%。
在这个例子中,通过添加另一个参数,我们称之为 configuration,并假设有 5 种可能的配置 / 参数值。这将生成一个包含 125 个测试的详尽套件。
Model POquestion
 Parameters:
   features : {A, B, C, D, E}
   customer:  {1, 2, 3, 4, 5}
   configuration: {config1, config2, config3, config4, config5}

 Constraints:
   # customer = 1 => features = A || features = B #
   # customer = 2 => features = A || features = B || features = C #
   # customer = 3 => features = A || features = D #
   # customer = 4 => features = B || features = D #
   # customer = 5 => features = A || features = B || features = C || features = D || features = E #
将其粘贴到 CTWedge 上,这将生成一个包含 31 个测试的测试套件。如果添加一些约束,表明某些特性不应该与某些配置一起工作,甚至可以进一步精简。
请注意,组合测试的建模可以并且确实包含等价分区、边界值分析和其他技术。模型越准确,测试套件的故障检测能力就越强。
(2) 代码示例 – NASA 的开关板共有 34 个开关
以 NASA 的一个例子为参考,有 34 个开关,每个开关可以处于打开或关闭的状态。要进行详尽的测试,有 170 亿种可能的组合方式。
不必测试所有的 2^34 种可能性。通过使用组合测试进行建模,你可以根据风险做出经过计算的决策。
Model NASAswitches

Parameters:
    switch1: Boolean
    switch2: Boolean
    switch3: Boolean
    switch4: Boolean
    switch5: Boolean
    switch6: Boolean
    switch7: Boolean
    switch8: Boolean
    switch9: Boolean
    switch10: Boolean
    switch11: Boolean
    switch12: Boolean
    switch13: Boolean
    switch14: Boolean
    switch15: Boolean
    switch16: Boolean
    switch17: Boolean
    switch18: Boolean
    switch19: Boolean
    switch20: Boolean
    switch21: Boolean
    switch22: Boolean
    switch23: Boolean
    switch24: Boolean
    switch25: Boolean
    switch26: Boolean
    switch27: Boolean
    switch28: Boolean
    switch29: Boolean
    switch30: Boolean
    switch31: Boolean
    switch32: Boolean
    switch33: Boolean
    switch34: Boolean
在 CTWedge 中通过下拉菜单开关测试的相互作用次数。
- 14 次测试:通过开关之间的 2 次相互作用引起的故障 - 可根据产品找到 60-99% 的所有潜在故障
- 33 次测试:通过开关之间的 3 次相互作用引起的故障 - 可根据产品找到 90-99% 的所有潜在故障
- 85 次测试:通过开关之间的 4 次相互作用引起的故障 - 可根据产品找到 95-99% 的所有潜在故障
- 220 次测试:通过开关之间的 5 次相互作用引起的故障 - 可找到超过 99% 的所有潜在故障
- 538 次测试:通过开关之间的 6 次相互作用引起的故障 - 可找到所有潜在故障的 100%
(2) 代码示例 - 西门子楼宇操作员 CI 配置
参考上面的幻灯片链接或直播视频以获取有关如何使用CAMetrics测量组合覆盖率的详细说明。基本上,你可以使用任何组合测试工具生成一个 CSV 文件,然后将其拖放到 CAMetrics 中。之后,CAMetrics 可以为你提供各种组合覆盖率报告。
请注意,将 CSV 转换为 JSON 非常简单,然后可以使用 JSON 文件在所选的任何测试框架中进行数据驱动测试。
Model CI
 Parameters:
   deployment_UI : { branch, development, staging }
   deployment_API:  { development, staging }
   spec_suite: { ui_services_stubbed, ui_services, ui_services_hardware, spot_check}
   browser: { chrome, electron, firefox }

 Constraints:
   // one extra constraint for firefox spot checks
   # browser=firefox <=> spec_suite=spot_check #
   // on staging, run all tests
   # spec_suite=ui_services_hardware <=> deployment_API=staging #
   // match dev vs dev, staging vs staging, and when on staging use Chrome
   # deployment_UI=development => deployment_API=development #
   # deployment_UI=staging => deployment_API=staging #
   # deployment_UI=staging && deployment_API=staging => browser=chrome #
   // when on branch, stub the services
   # deployment_UI=branch => spec_suite=ui_services_stubbed #
   // do not stub the services when on UI development
   # deployment_UI=development => spec_suite!=ui_services_stubbed #
组合测试参考资料和延伸阅读
幻灯片 16-50:探讨自动化和组合纪律在辅助探索性测试方面的应用
性能测试
性能测试一段简要说明
虽然性能测试是一个庞大的话题,但作为 Web 开发者,我们可以迅速从其核心原则中获益,以提升用户体验、满足功能和非功能需求(NFRs),并检测可能泄漏到生产环境中的不明确系统问题。
(1) 通过 Lighthouse 确保用户体验
作为 Web 开发者,我们最关心的是用户对性能的感知。谢天谢地,Google 已经让这变得简单,并为我们提供了一个第三方权威评估我们 Web 应用程序的工具 - Lighthouse。
“Lighthouse 是一个用于提高网页质量的开源自动化工具。你可以对任何网页运行它,无论是公开的还是需要身份验证的。它可以进行性能、可访问性、渐进式 Web 应用、SEO 等方面的审计。”
在这个话题中,我们只关注性能,但你也应该考虑从 Lighthouse 的审计中获得关于渐进式 Web 应用、可访问性、搜索引擎优化和最佳实践的评估。
入门很简单:Chrome > 开发者工具 > 审计 > Lighthouse。然后,生成报告。它会显示如下,并为你提供有关如何改善用户体验的详细指南。
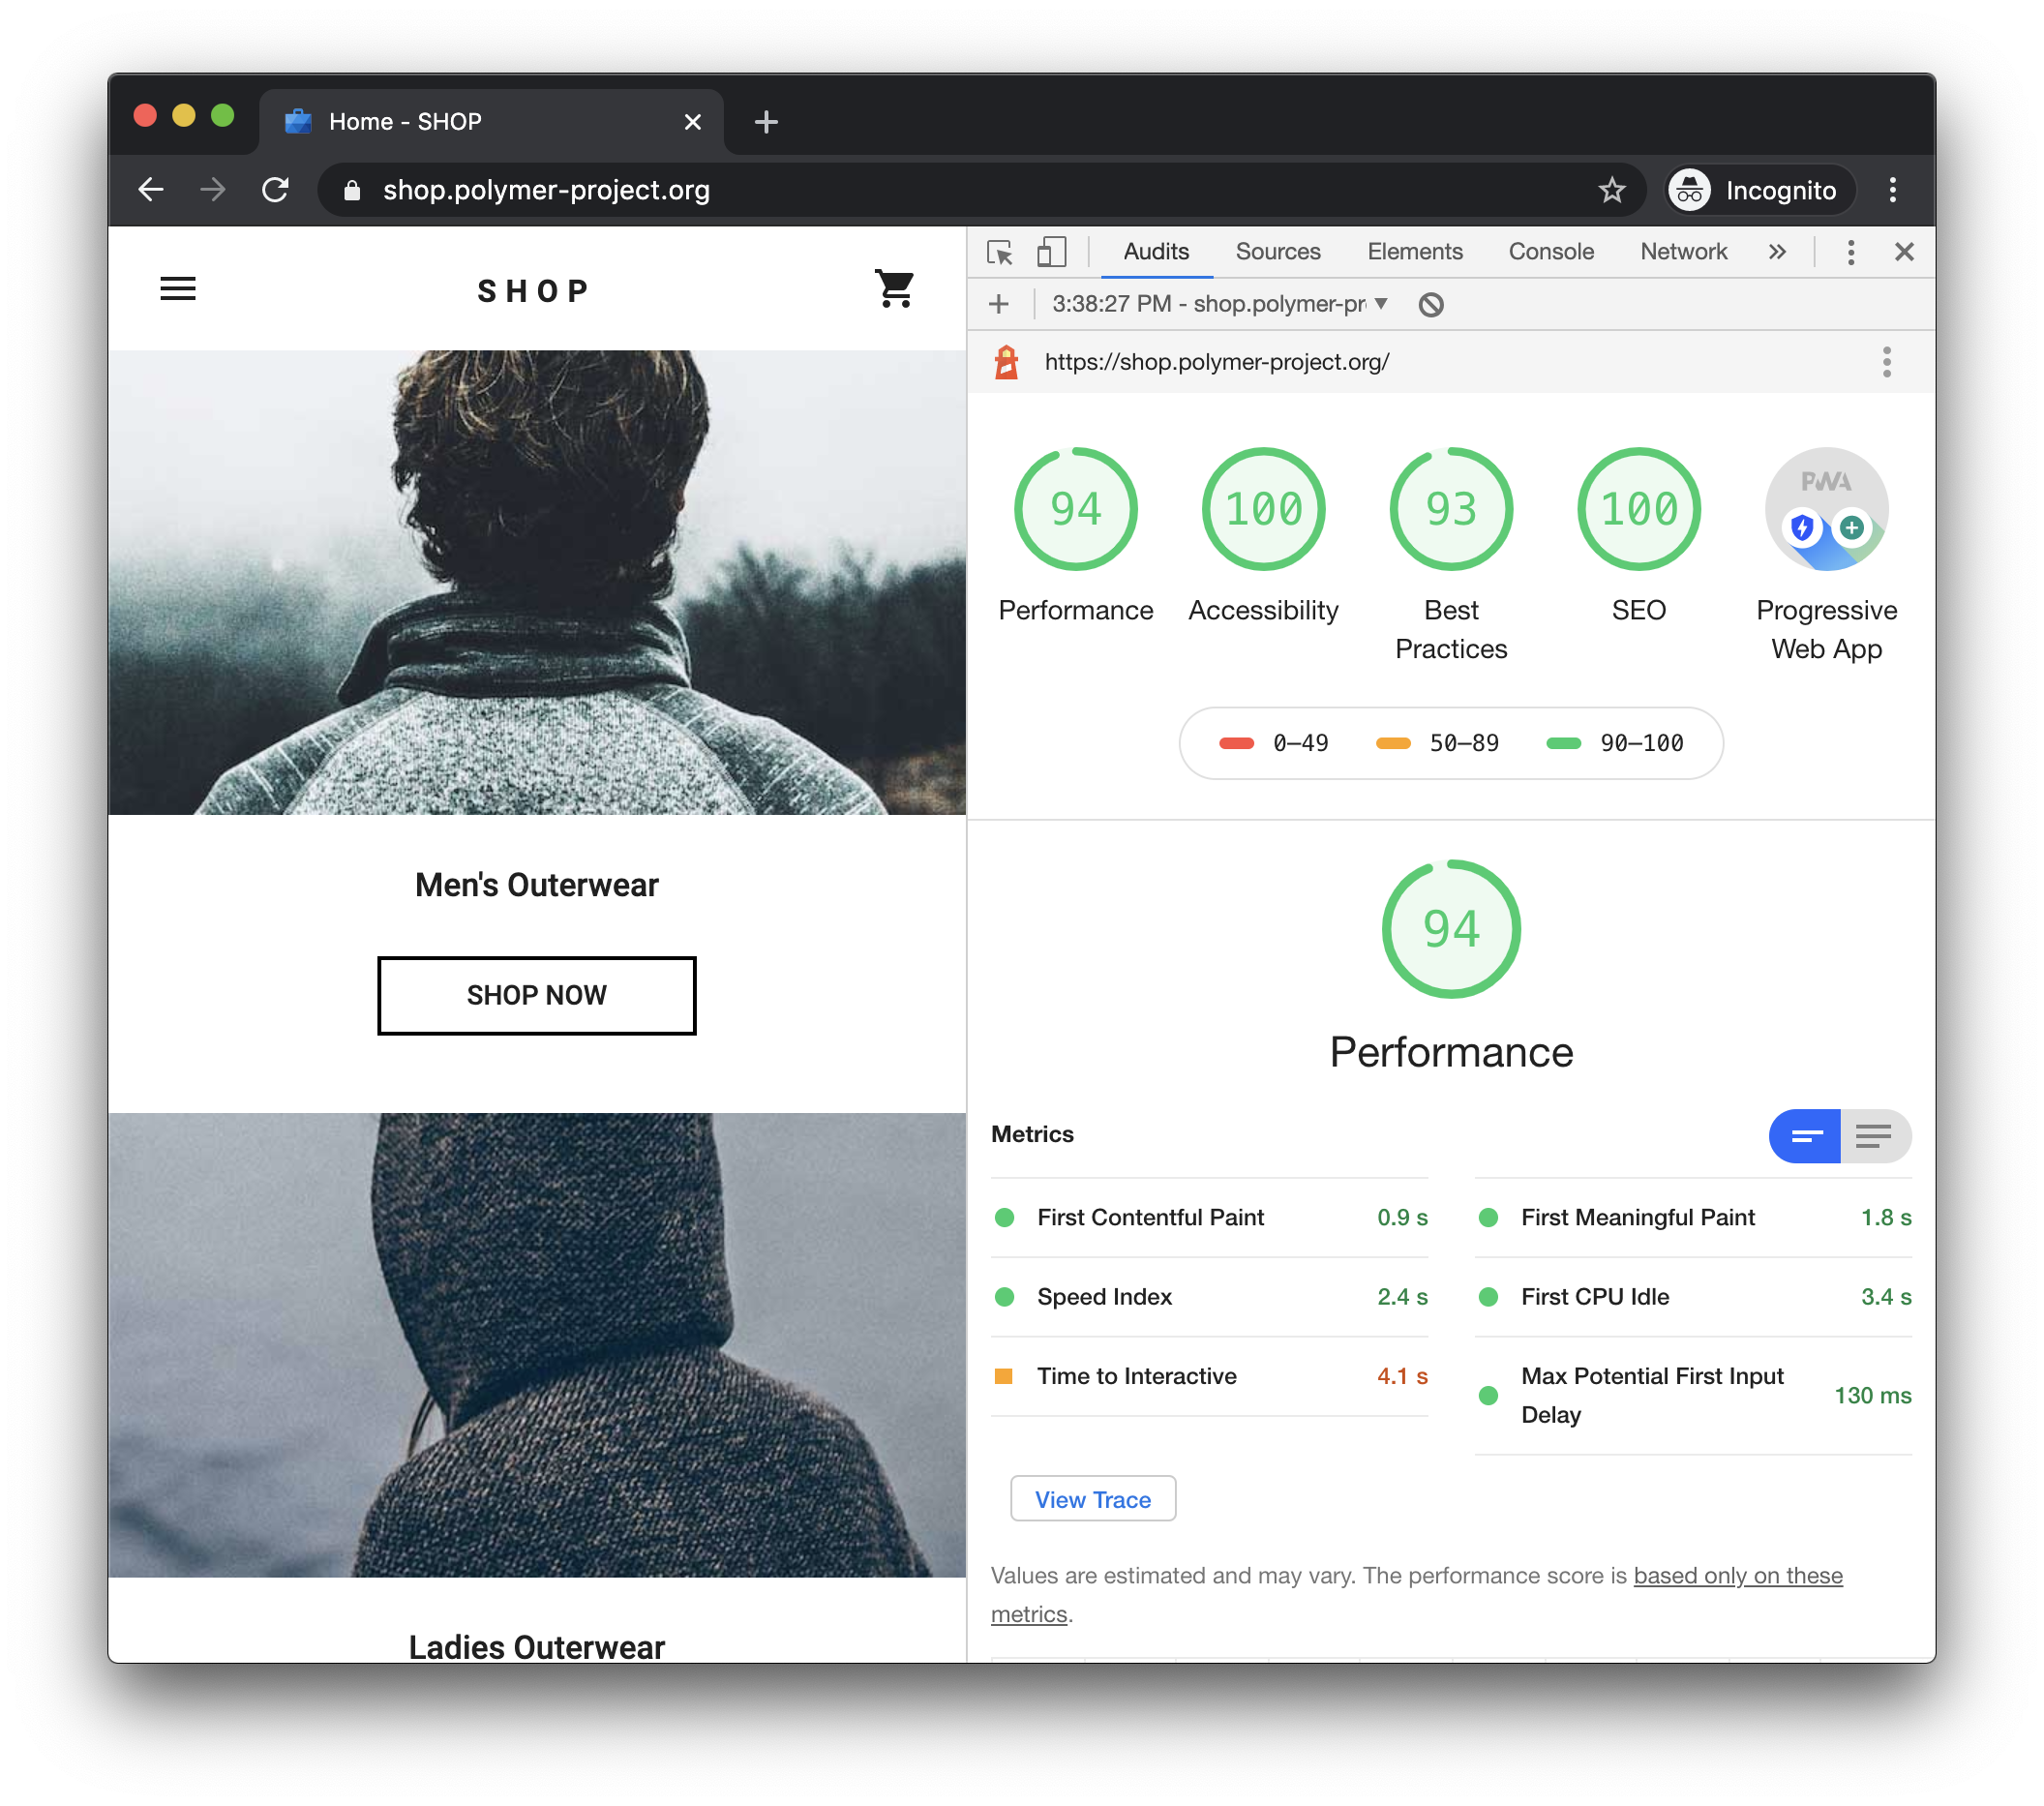
一旦进行了改进并达成了基线评级,您可以通过将 Lighthouse 纳入您的 CI 来防止回归。
- 将 Lighthouse 添加为 node_module;
npm i -D lighthouse或yarn add --dev lighthouse。 - 参考 Lighthouse Git 存储库 上的工作流示例。
- 防止性能评级(和/或其他评级)在开发人员提交代码时出现回归!
使用 Cypress 集成 Lighthouse
如果你是 Cypress 用户,通过 cypress-audit 插件,你可以在 Cypress 测试中执行 Lighthouse 审计,以及 Pa11y 进行自动化的可访问性测试。
以下是一个带有内联说明的示例测试。
// Pass in optional configuration parameters for the Cypress test:
// you may need to increase default timeout for the overall task, if you have a slow app. Mind that Lighthouse is only for Chromium based browsers
describe('Lighthouse audit ', { taskTimeout: 90000, browser: 'chrome' }, () => {
  before(() => {
    // if you are using programmatic login, you might not need to use the cy.forceVisit('/') workaround for cross-origin (linked above)
    cy.login(Cypress.env('USERNAME'), Cypress.env('PASSWORD'));
  });

  // thresholds is the first argument to cy.lighthouse(), most of the performance configuration is done here.
  // a complete list of Lighthouse parameters to use as thresholds can be found at https://github.com/mfrachet/cypress-audit/blob/master/docs/lighthouse.md
  // for an explanation of the parameters, refer to https://web.dev/lighthouse-performance/
  const thresholds = {
    'first-contentful-paint': 20000,
    'largest-contentful-paint': 35000,
    'first-meaningful-paint': 20000,
    'speed-index': 25000,
    interactive: 40000,
    performance: 5,
    accessibility: 50,
    'best-practices': 50,
    seo: 50,
    pwa: 20
  };

  // the 2nd, and optional argument to cy.lighthouse() replicates Lighthouse CLI commands https://github.com/GoogleChrome/lighthouse#cli-options
  const desktopConfig = {
    formFactor: 'desktop',
    screenEmulation: { disabled: true }
  };

  // your app may need this beforeEach and afterEach workaround for cross-origin (linked above)
  beforeEach(() => {
    cy.restoreLocalStorage();
    // Preserve Cookies between tests
    Cypress.Cookies.defaults({
      preserve: /[\s\S]*/
    });
  });

  afterEach(() => {
    cy.saveLocalStorage();
  });

  it('should pass audit for main page ', () => {
    cy.lighthouse(thresholds, desktopConfig);
  });

  it('should pass audit for another page', () => {
    cy.forceVisit('anotherUrl');
    cy.lighthouse(thresholds, desktopConfig);
  });
});

// Commands for working around cross origin, if needed

// -- Save localStorage between tests
let LOCAL_STORAGE_MEMORY = {};
Cypress.Commands.add('saveLocalStorage', () => {
  Object.keys(localStorage).forEach(key => {
    LOCAL_STORAGE_MEMORY[key] = localStorage[key];
  });
});

Cypress.Commands.add('restoreLocalStorage', () => {
  Object.keys(LOCAL_STORAGE_MEMORY).forEach(key => {
    localStorage.setItem(key, LOCAL_STORAGE_MEMORY[key]);
  });
});

// -- Visit multiple domains in one test
Cypress.Commands.add('forceVisit', url => {
  cy.window().then(win => win.open(url, '_self'));
});
(2) 性能作为一种非功能性需求和 Kano 模型
我们可以通过Kano 模型开始建立对性能需求的理解。
“Kano 模型是在 1980 年代由日本学者狩野纪明教授开发的产品开发和客户满意度理论,将客户偏好分为五类。”
从高层次上看,卡诺模型总结了性能特性是标准要求,是任何竞争性产品所期望的。这与我们使用 Lighthouse 的方式重叠;通过它,我们确保满足客户偏好,并确保我们不会回退。

在这一点上,我们已经满足了明确说明的性能要求。然而,在复杂的应用程序中,我们还需要注意非功能性需求(NFRs)。但是,什么是 NFRs 呢?下面是它们在一瞥之下的高层次视图 - 来自双重标准的ISO/IEC 25010 产品质量模型。
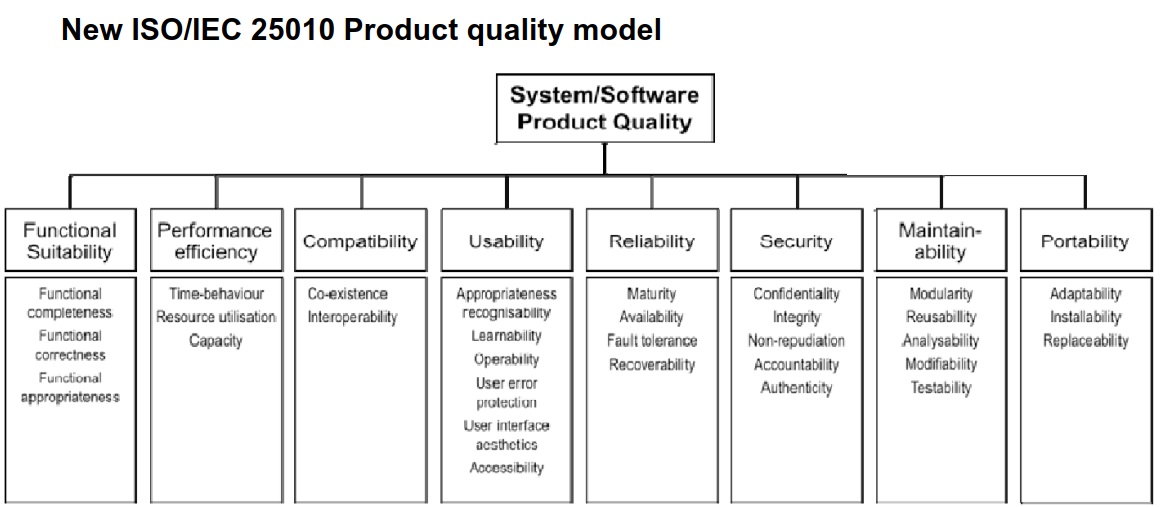
在下一节中,让我们专注于 NFRs 如何帮助我们进行非功能性能测试的方法。
(3) 性能测试的类型
为了实际应用,我们可以将非功能性能测试分为 3 个类别
- Load 负载测试
- Spike 尖峰测试
- Endurance 耐久测试
这张图总结了它们的上下文:
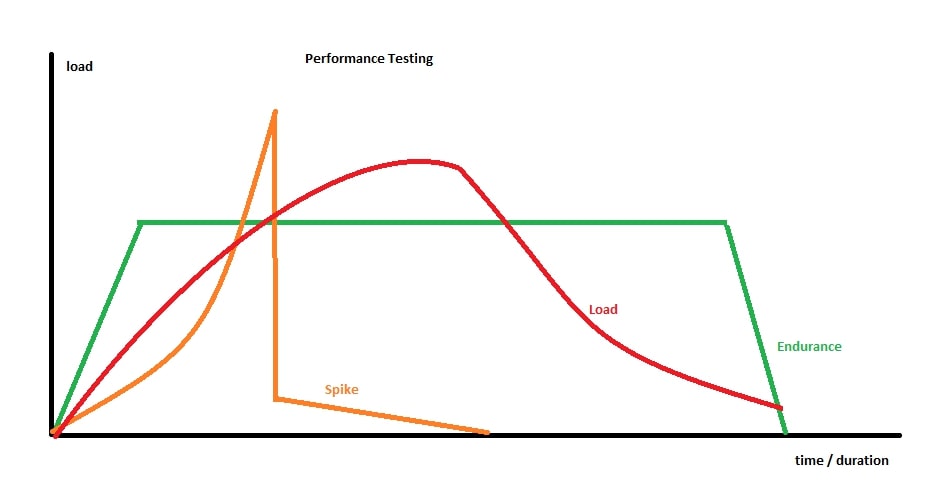
关于基准测试和压力测试的额外说明: 本质上,基准测试归结为逐步的步骤,因为我们逐渐了解我们的系统,这成为了初始工作流程的一部分,其中使用自动化工具;“我的系统已经崩溃了吗?没有?那我再增加一点”。而压力测试,简而言之,就是做得过火了。
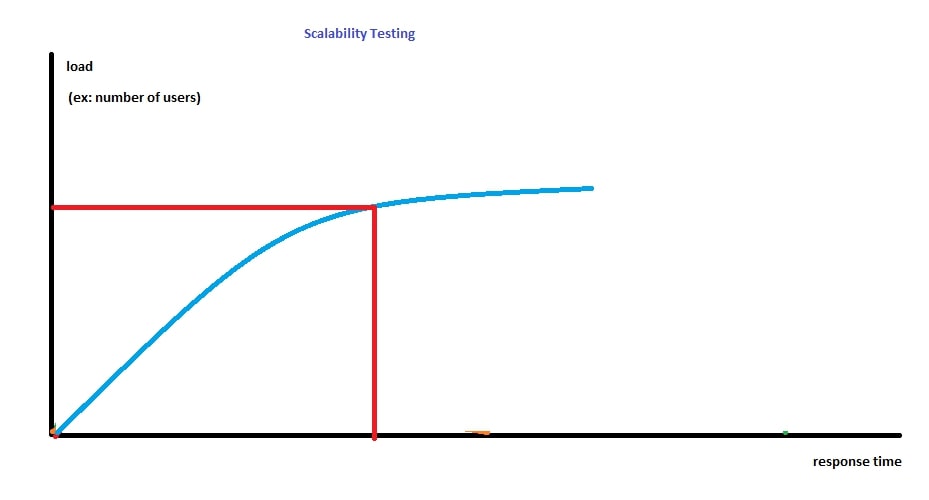
那么可扩展性测试的区别是什么?它是相关的;区别在于系统何时开始以不令人满意的方式不响应的评估。通常情况下,使用自动化工具的方法足够接近,并且可以在负载测试中分析图表时实现。
这是可扩展性测试意图的高层次图:
(4) 使用 k6-loadImpact 进行性能测试的实际应用
k6-loadImpact在 Web 开发领域有两个显著的特点。
- 使用 JS(ES6)
- 专为 CI 构建
额外的好处:如果你习惯使用 Postman,你可以轻松地将这些测试转换为 k6。 K6 可以 进行 DOM 测试,但我们认为 Lighthouse 已经处理了这方面的问题。K6 真正强大的地方在于测试 API 时。
你可以在这里找到使用 k6 的快速入门示例。 这些示例从非常简单的开始,旨在快速建立理解。它们已经准备好直接运行和调整。我们将不会在这里重复这些知识。
相反,在本节中,我们将概述 k6 测试的概览,并稍后展示一个代码示例,演示如何配置 k6 以适应不同类型的性能测试。
// k6 lifecycle overview:

// 1. init code -> runs once
// this is where we configure the type of performance testing (there are also
// additional options we do not cover here)
export let options = {
  // there will be 1 virtual user
  vus: 1,

  // default function() will execute 1 time. This simple config
  // is best when trying to get things to work
  iterations: 1,
}

// 2. (optional) setup code -> runs once
export function setup() {
  // for example getting a token so you can run API tests in the default
  // function that comes in (3) virtual user code

  // what gets returned from this function is passed as an argument to the next
  // function. For example: `token`
  return getTokenForUser();
}

// 3. virtual user code -> runs once or many times based on
// `export let options = { ... } `
export default function(token) {
  // http.get is a k6 function that hits a URL with optional test parameters
  // note that  we do not need a token for this url
  http.get("http://test.loadimpact.com");
}

// 4. (optional) teardown code -> runs once
export function teardown(data) {
  // this is in case you need to clean up, for instance if failed test may
  // leave residue an impact state
}
耐久测试配置:
export let options = {
  // endurance test for 30 seconds with 50 virtual users. Adds users immediately
  vus: 50,
  duration: "30s",

  // alternative to duration, you can  specify the exact number of iterations
  // the test will run
  // iterations: 500,
}
负载测试配置:
export let options = {
  // for 15 seconds ramps up 10 users, adds users gradually
  // adds a total of 40 users in the next 15 seconds, and up to 50 in the next
  // 30 seconds..
  // lowers down the users to 10 and 5 in the next 15 second iterations
  stages: [
    { duration: "15s", target: 10 },
    { duration: "15s", target: 40 },
    { duration: "30s", target: 50 },
    { duration: "15s", target: 10 },
    { duration: "15s", target: 5 },
  ]
}
尖锋测试配置:
export let options = {
  // starts slow and builds up the load rapidly, and then drops the load
  stages: [
    { duration: "5s", target: 1 },
    { duration: "5s", target: 5 },
    { duration: "5s", target: 25 },
    { duration: "3s", target: 200 },
    { duration: "3s", target: 20 },
    { duration: "3s", target: 10 },
    { duration: "3s", target: 5 },
    { duration: "3s", target: 1 },
  ]
}
正如你所看到的,stages 是配置性能测试类型的实用工具。
我们如何分析测试结果?
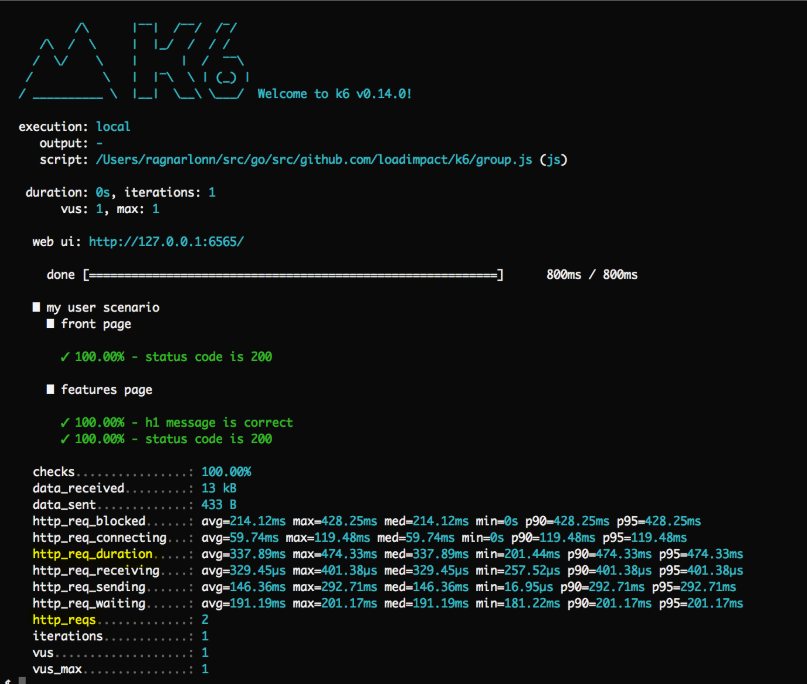
K6 提供了一个简单的CLI 输出。我们认为这里最重要的两个高级数值是 http_req_duration,它详细说明了响应持续时间,以及 http_req,它显示发送的请求数量。如果这些数值在可接受的范围内,CLI 就达到了其目的。
如果需要进行更深入的诊断,图形化的insights非常有价值。在这样的图表中,关键是 响应时间 和 请求速率 跟随 虚拟用户 的趋势。任何趋势上的变化都可能提示潜在问题。
(5) 通过性能测试来防止不稳定的问题进入生产环境
可参考章节 不稳定的测试 > 第三步:识别零星的系统问题 - 不稳定的系统
性能测试参考资料和延伸阅读
参考资料
- UI 测试最佳实践项目:https://github.com/NoriSte/ui-testing-best-practices
- UI 测试最佳实践项目中文翻译:https://github.com/naodeng/ui-testing-best-practices
欢迎关注软件测试同学的公众号“软件测试同学”,原创 QA 技术文章第一时间推送。

